Automatic Expense Categorization Guide
Automatic expense categorization sorts your transactions into budget categories for you. Instead of opening every expense and tagging it by hand, your expense tracker can recognize text patterns like supermarket purchases, fuel payments, rent, subscriptions, and loan payments.
For busy professionals, this saves a lot of repeat work. Manual tagging is useful for one-off spending, but automatic categorization is better for daily transactions that follow the same pattern every week or month.
How automatic expense categorization works
Automatic expense categorization works by looking at details in a transaction, then matching those details to a category. Common signals include merchant name, transaction description, note text, amount, account, payment method, and repeat timing.
Rule-based categorization uses clear instructions that you create. For example, you can make a rule that says, “If merchant contains Starbucks, categorize as Food and Dining.” You can also create rules for rent, salary, fuel, groceries, subscriptions, debt payments, and transfers. Rule-based systems are predictable because you know why each transaction was sorted.
AI-based categorization tries to understand transactions from patterns. It may compare merchant names, past choices, transaction history, and common spending behavior to guess a category. This can be useful when descriptions are messy or when a merchant name is unfamiliar, but the result may need review.
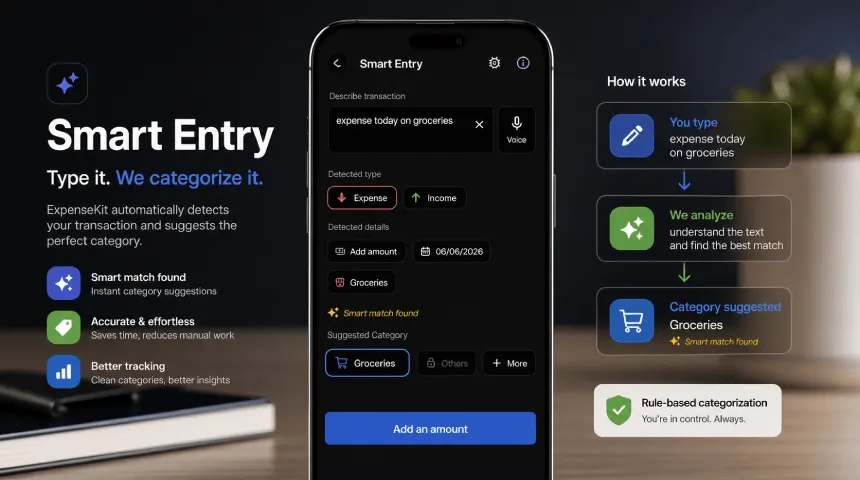
Both methods can work together. Rules are best for merchants you know and repeat transactions you want handled the same way every time. AI can help with new or unclear transactions. In ExpenseKit, automatic categorization is rule-based for entered or imported transaction text, so you can control how transactions are sorted and adjust rules when your spending changes.
Manual vs. automatic: which should you use?
| Factor | Manual categorization | Automatic categorization |
|---|---|---|
| Speed | Slower because every transaction needs review | Faster because rules sort entered or imported transactions automatically |
| Accuracy | High when you enter details carefully | High for repeat merchants, but new transactions may need review |
| Customization | Flexible for one-off or unusual expenses | Flexible through rules, merchant matching, and category choices |
| Best for | Cash spending, special purchases, and detailed notes | Recurring bills, subscriptions, groceries, transport, and daily card spending |
How to set up automatic categorization in ExpenseKit
-
Add or import transactions. Open ExpenseKit and enter expenses manually, use smart entry, or import supported transaction files. Clear merchant names, notes, and descriptions make rules easier to apply.
-
Review recent transaction text. Check recent transactions before turning on broad automation. This helps you see common merchant names, repeated bills, and categories that need rules.
-
Open the rules editor. Go to automatic categorization settings and create a new rule. Choose the condition, such as merchant name contains, transaction description contains, amount equals, or account equals.
-
Choose the target category. Match each rule to the category you want, such as Groceries, Transport, Bills, Dining, Debt Payments, or Subscriptions. For example, a rule can send all transactions from your internet provider to Utilities.
-
Test and adjust rules. Apply rules to recent transactions, review the results, and fix anything that landed in the wrong category. Keep rules simple at first, then add more detail when you see repeat mistakes.
Tips for cleaner automated expense categorization
Start with your most predictable transactions first. Rent, salary, insurance, subscriptions, loan payments, and utilities are usually easy to automate because they repeat with similar names and amounts.
Use broad categories before creating tiny ones. For example, start with Food and Dining, then split Groceries and Restaurants later if you need more detail.
Review uncategorized transactions once a week. Automation reduces manual work, but a quick review keeps reports accurate and catches new merchants.
Avoid conflicting rules. If one rule sends “Amazon” to Shopping and another sends the same merchant to Household, ExpenseKit may need your chosen priority or a more specific condition.
FAQ
What should I use to auto-categorize expenses?
Use a personal finance app with category rules, import or fast-entry tools, and a review screen. ExpenseKit is built for this workflow because entered or imported transaction text can be sorted with automatic categorization rules.
What are the best expense management tools for automatic categorization?
The best expense management tools for automatic categorization should support editable rules, custom categories, transaction review, budgets, and reports. Choose a tool that lets you correct categories easily instead of locking you into guesses.
What is automated expense categorization?
Automated expense categorization is the process of sorting transactions into categories with software. It can use rules, AI, or both to place transactions under categories like Groceries, Transport, Bills, Dining, and Debt Payments.
How do I categorize expenses automatically?
Create rules for common merchants, notes, or descriptions, assign each rule to a category, then review recent transactions. Over time, add or adjust rules so repeat spending lands in the right place with less manual work.
Ready to spend less time sorting transactions?
Automatic categorization works best when your category system is clear first. Read the main guide on how to categorize expenses to choose better categories before building rules in ExpenseKit.